Ever wondered why some gardens flourish while others struggle? I’ve been there, watching my plants wilt despite my best efforts. That’s when I discovered soil testing kits, a game-changer for any gardener.

Using a simple kit, I could uncover the hidden secrets of my soil, from nutrient levels to pH balance. It was empowering to know exactly what my plants needed to thrive. Whether you’re a seasoned green thumb or just starting out, understanding your soil can make all the difference.
Understanding Soil Testing Kits
Soil testing kits provide essential insights into your garden’s soil health. By analyzing key factors, they help you optimize plant growth.
Components Of A Soil Testing Kit
Most soil testing kits include:
- Testing Containers: Small vials for collecting soil samples.
- Chemical Reagents: Solutions that react with soil to indicate nutrient levels.
- pH Strips or Meters: Tools to measure soil acidity or alkalinity.
- Instruction Manual: Step-by-step guide for accurate testing.
- Color Chart: Reference for interpreting results based on color changes.
How They Work
Soil testing kits operate through chemical reactions. First, you collect a soil sample and mix it with the provided reagents. The chemicals react with specific nutrients, causing color changes. By comparing the resulting color to the chart, you determine levels of essential elements like nitrogen, phosphorus, potassium, and the soil’s pH. This process allows you to make informed decisions about fertilizer application and soil amendments.
Importance Of Soil Testing
Understanding your soil’s composition is crucial for successful gardening. Accurate soil testing provides the insights needed to create the optimal environment for your plants.
Enhancing Plant Health
Proper soil testing identifies nutrient imbalances that can hinder plant growth. For example, a deficiency in nitrogen may result in yellowing leaves, while excess phosphorus can inhibit the uptake of other essential nutrients. By addressing these issues, I ensure that my plants receive the necessary nutrients to thrive, leading to stronger roots and vibrant foliage.
Optimizing Fertilizer Use
Soil testing allows me to apply fertilizers more effectively, reducing waste and promoting sustainability. Instead of guessing the amount of fertilizer needed, I use the test results to determine precise quantities. This targeted approach not only saves money but also minimizes the risk of nutrient runoff, protecting the surrounding environment.
Types Of Soil Testing Kits
Soil testing kits vary to meet different gardening needs and expertise levels. Understanding each type helps in selecting the right kit for optimal plant health.


Basic Testing Kits
Basic soil testing kits offer essential insights for beginner gardeners. They include pH testing strips and tests for primary nutrients like nitrogen, phosphorus, and potassium. These kits simplify the testing process with straightforward instructions and easy-to-read color charts. For example, a typical basic kit might cost between $10 and $25, making it accessible for casual gardeners. Simple tools like handheld pH meters are common, providing quick results without the need for additional equipment.
Advanced Testing Kits
Advanced soil testing kits provide comprehensive analysis for experienced gardeners. They test a wider range of nutrients, including calcium, magnesium, and micronutrients. These kits often feature digital pH meters, larger sample sizes, and precise chemical reagents for accurate measurements. Prices range from $50 to $100, reflecting their detailed capabilities. Additionally, some advanced kits offer connectivity with smartphone apps, allowing gardeners to track soil health over time and make informed adjustments for optimal plant growth.
How To Use A Soil Testing Kit
Using a soil testing kit is simple when you follow these steps.
Step-by-Step Guide
- Collect Soil Sample
Gather samples from multiple garden areas using a clean tool. Mix them in a clean container, removing debris like roots and stones.
- Prepare the Sample
Spread the mixed soil on a clean surface and let it air dry for 24 hours. Avoid using heat to prevent altering the results.


- Test pH Level
Add the soil sample to the pH reagent provided in the kit. Compare the resulting color to the chart to determine the soil’s acidity or alkalinity.
- Test Nutrient Levels
Use the reagents for nitrogen, phosphorus, and potassium. Mix each nutrient test with soil and water, then match the color change to the chart to identify nutrient levels.
- Record and Analyze Results
Document the pH and nutrient levels. Use this information to decide on necessary soil amendments or fertilizer applications to enhance plant health.
Common Mistakes to Avoid
- Using Contaminated Tools
Always use clean tools to prevent introducing foreign substances that can skew results.
- Inconsistent Sampling
Collect samples from various locations and depths to obtain a representative soil profile.
« Drip Irrigation Systems: Essential Setup Tips for a Thriving Garden How to Create a Hardscape Chess Board: Step-by-Step DIY Guide »
- Ignoring Instructions
Follow the kit’s guidelines precisely to ensure accurate measurements and interpretations.
- Not Drying Soil Properly
Ensure the soil is completely dry before testing, as moisture can affect the accuracy of the results.
- Misinterpreting Color Charts
Take your time to accurately match colors to the chart. Consider taking a photo for reference to avoid mistakes.
Choosing The Right Soil Testing Kit
Choosing the right soil testing kit ensures you get accurate results tailored to your gardening needs. Here’s how I select the best kit for my garden.
Factors To Consider
When selecting a soil testing kit, consider these key factors:
- Accuracy: Look for kits that provide precise measurements for pH and essential nutrients.
- Ease of Use: Choose kits with clear instructions and simple procedures to avoid confusion.
- Nutrient Range: Ensure the kit tests for primary nutrients like nitrogen, phosphorus, potassium, and additional micronutrients if needed.
- Cost: Basic kits range from $10 to $25, while advanced kits cost between $50 and $100. Select one that fits your budget.
- Reusability: Some kits offer multiple tests, providing better value over time.
- Reporting Format: Opt for kits that present results in an easy-to-understand format, such as color charts or digital displays.
- Additional Features: Advanced kits may include features like smartphone connectivity for tracking soil health.
Top Recommended Kits
- Luster Leaf 1601: A basic kit priced around $15, ideal for beginners. It tests pH, nitrogen, phosphorus, and potassium with easy-to-read color charts.
- Sonkir Soil pH Meter: Priced about $25, this digital meter offers quick pH readings and is reusable, making it cost-effective.
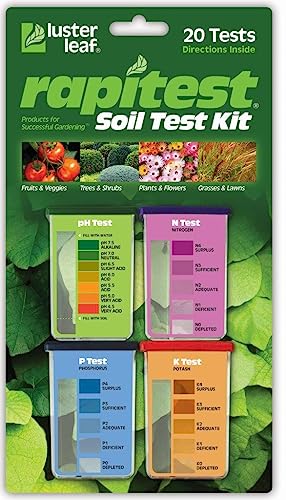
- Rapitest Soil Test Kit: At approximately $20, it provides comprehensive analysis for pH and primary nutrients with clear instructions.
- LaMotte Garden Guide: An advanced kit costing around $70, it tests a wide range of nutrients and includes detailed reporting for experienced gardeners.
- Kelway X Soil Health Kit: Priced near $50, it offers detailed nutrient analysis and smartphone connectivity for tracking soil health over time.
Conclusion
Using a soil testing kit has truly changed how I approach gardening. It’s incredible to see the difference accurate soil insights can make to plant health. I feel more connected to my garden knowing exactly what it needs to thrive. If you’re passionate about your plants, investing in a soil testing kit can make your gardening efforts more successful and enjoyable. Here’s to healthier gardens and happier plants!


